Difference between revisions of "EnterMice (Spanish)"
(→Use of the driver) |
(→Instalación) |
||
| Line 174: | Line 174: | ||
| − | El controlador del ratón se puede instalar por todos los métodos es decir, desde Basic "START"(si está en un cassette) o LOAD "MOUSE.XR". También se puede cargar desde el "WP", desde EXDOS o desde cualquier otro interprete(revise el manual del lenguaje de programación para más detalles). | + | El controlador del ratón se puede instalar por todos los métodos es decir, desde Basic "START"(si está almacenado en un cassette) o LOAD "MOUSE.XR". También se puede cargar desde el "WP", desde EXDOS o desde cualquier otro interprete(revise el manual del lenguaje de programación para más detalles). |
| − | + | Una vez instalado seguirá residente hasta el siguiente restablecimiento completo o hasta apagar el ordenador. | |
| − | + | Después, para que funcione correctamente, es necesario inicializarlo con el comando EXOS ":PB". El EGI y Paintbox hacen esto internamente | |
| − | Ignore | + | Ignore el mensaje de error que saldrá. El código de error (obtenido en Basic con la función EXTYPE) es 9.000 + la página de memoria donde se ha cargado el controlador. Este comportamiento fue introducido deliberadamente por los programadores del controlador. |
| − | + | Se puede proporcionar una versión que auto-inicializa sola si se solicita, pero entonces no funcionará con el EGI o con Paintbox, sólo en Basic. | |
| − | + | Nunca cargue mas de una vez ni ejecute dos veces el comando de inicialización, ya que el Enterprise se puede quedar colgado. | |
| − | + | Ejecutando ":RATÓN" en EXOS nos va a mostrar información sobre la versión del controlador y, si el Entermice está conectado también mostrará información sobre el Interfaz. | |
====Communicating with the mouse driver==== | ====Communicating with the mouse driver==== | ||
Revision as of 15:19, 9 December 2015
Puertos de Joystick e Interfaz de Ratón PS/2 para el ordenador Enterprise 64/128
Contents
- 1 Introducción
- 2 Lista programas compatibles hasta la fecha
- 3 Descripción General
- 4 Importante
- 5 Conectándolo al ordenador
- 6 Caracteristicas
- 7 Uso del controlador
- 8 Troubleshooting
- 9 Technical specification
- 10 Information for developers
Introducción
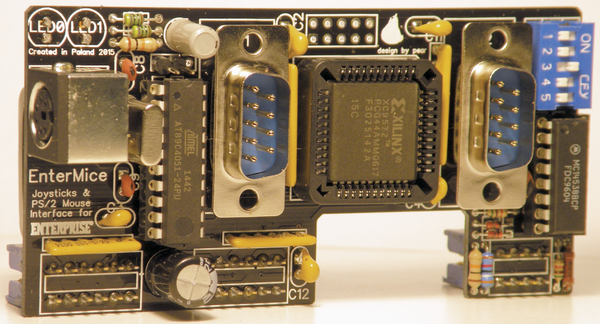
Este sofisticado interfaz ha sido diseñado especialmente para el ordenador Enterprise 64/128.
Se ha logrado culminar tras seis meses de trabajo de un desarrollador polaco multidisciplinar conocido en importantes foros como "Pear" (a instigación del colega español GFlorez, que también fue el primer probador del EnterMice junto a Zozo).
El objetivo principal del adaptador es permitir el uso en el micro-ordenador Enterprise de asequibles ratones PS/2. Además, permite la conexión directa de dos joysticks de norma Atari sin adaptadores adicionales.
EnterMice se basa en soluciones utilizadas en la interfaz del ratón BoxSoft, que soporta el ratón Neos (protocolo MSX).
Uno de los modos de funcionamiento de EnterMice es totalmente compatible con la antigua interfaz de ratón BoxSoft. Otro modo de operación convierte el movimiento del ratón en pulsaciones de joystick.
Un poco de historia sobre Enterprise y ratones
Mejorar el Enterprise128 con control por ratón no es una nueva y excéntrica idea de un grupo de frikis de los retro-ordenadores, ya estaba previsto por los diseñadores originales del EP. El problema era que la misión de implementarlo fue sub-contratada a Aztec Software Ltd, una modesta compañía inglesa que suministró un resultado decepcionante; por dos razones principales: en primer lugar, el producto era feo [1], muy lejos de las formas redondeadas del Enterprise. En segundo lugar, no era un ratón adecuado, ya que se basaba en la emulación del movimiento de un joystick. También en ese momento Enterprise Computing Ltd. estaba desapareciendo.
Pero la base de usuarios en el Reino Unido se mantuvo muy activa durante los siguientes años. Entusiastas del Enterprise fundaron pequeñas compañías. Se ofrecieron nuevos productos: ampliaciones de memoria, cables adaptados, juegos, utilidades, emuladores de Spectrum, una controladora IDE, Eprom, expansiones de la placa base, módems RS232, y mas.
La empresa más activa fue Boxsoft, fundada por el desarrollador Tim Box. Boxsoft ofrecía la mayor parte de los productos enumerados anteriormente. Dentro del paquete de un programa de dibujo llamado "Paintbox" [2], se comercializaba también un adaptador [3] más un ratón Neos con su controlador incluido. El Neos, internamente [4] un ratón MSX [5], ya había sido adaptado con éxito a otros ordenadores de 8 bits, como el Commodore 64.
En ese momento sólo unos pocos ordenadores de 8 bits tenían un ratón que funcione con alguna forma de GUI. Era muy difícil vender algo nuevo de uso desconocido y no completamente integrado en el equipo. Visto desde la perspectiva actual, la ventaja de navegar por los sistemas operativos y aplicaciones con un ratón es obvio, y se nota aun mas en el instante que este deja de funcionar...
Al final, sólo se vendieron alrededor de un centenar de "Paintbox".
El programa "Paintbox" llegó a Hungría en solitario. Los húngaros compraron los ordenadores Enterprise sabiendo que procedían de Reino Unido, pero no mucho más. Cuando se vendieron todos los Enterprise128, la base de usuarios fue abandonada tal como en el país de origen. Una vez más, nuevas compañías surgieron ofreciendo nuevos productos. Entonces una empresa llamada "A Studio" comenzó a fabricar y vender los artículos Boxsoft, camuflándolos como si fuesen sus propios productos. Uno de los programas era una versión de "Paintbox" sin la opción del ratón. Todavía necesita el controlador, pero una versión capada. En el lado este del Telón de Acero nadie oyó nunca hablar sobre que era un ratón Neos.
Más tarde, en Hungría, salió al mercado una tarjeta de expansión RS232 [6] para el Enterprise, fruto de la genialidad de un equipo de desarrolladores húngaros: Gyula Mészáros por el hardware, y László Haluska ( HSOFT) para la parte de software. HSOFT tomó el controlador de ratón capado de "A Studio" y lo modificó para adaptarlo a la interfaz serie para su uso con un ratón "Mouse Systems" y después suministraría un controlador integrado para el sistema operativo 2.x EPDOS.
Esto es historia antigua, pero en los últimos años, con la WWW, Internet y la globalización, surgieron algunos de los antiguos artefactos Boxsoft + Neos y todas las piezas del rompecabezas empezaron a encajar. Por fin, las antiguas promesas (vistas en la propaganda de Enterprise Computers Ltd.) de una verdadera interfaz de ratón para el Enterprise, empezaban a hacerse realidad.
El nuevo interfaz EnterMice que es presentado aquí se basa en el trabajo del equipo Boxsoft, pero adaptado a la actualidad y mejorado con nuevas opciones. (Es un milagro lo que Tim Box logró entonces con solo una pocas puertas lógicas y diodos). En cuanto a la programación, el eficaz controlador fue creado por D. Rabson, Andrew Fitter y Andrew Richards. Con pequeñas modificaciones, es el mismo controlador que se usará con el adaptador Entermice.
El principal problema que aparece en el momento de conectar un ratón o un joystick a el Enterprise es que los conectores y sus señales están muy lejos de ser un estándar. Pequeños conectores de borde de placa que pueden ser enchufados al revés, varios comunes conectados a +5v para los botones cuando lo normal es un solo común conectado a cero voltios, falta de protección en los retornos de señal cuando dos o mas botones son pulsados, ningún modo de mandar información o estado al dispositivo, y probablemente algún problema más.
Ahora, lo que Boxsoft creó con asequibles y comunes componentes, ha sido rediseñado y mejorado con dos circuitos integrados programables y otros modernos componentes. Uno de los chips (Xilinx) está al cargo de la conversión de conectores y señales al estándar de puertos de juego Atari. El interfaz original Boxsoft solo ofrecía la conversión del primer puerto de control, que era usado para conectar el ratón Neos o un joystick tipo Atari(nunca al mismo tiempo). En el presente proyecto se pueden conectar dos joystick y eso no interfiere con el conector de Ratón.
El ratón Neos(MSX) no es muy común hoy en día, por lo que se ha incluido un conversor de protocolo de PS/2 a MSX. Lo rige un económico y sencillo Atmel AT89C4051 a 12Mhz, capaz de adaptable to adaptarse a la frecuencia del procesador Z80 instalado en el Enterprise. Con este circuito integrado y la apropiada programación en su interior, Entermice puede funcionar tanto en un EP a 4 MHz como en uno potenciado a 10 MHz, sin problemas.
También, el protocolo de lectura del ratón ha sido ampliado siguiendo el nuevo protocolo extendido de MSX lanzado por Prodatron(desarrollador de SymbOS) y NYYRIKKI(desarrollador de MSX). Ahora Entermice es capaz de mandar información de hasta cinco botones y una rueda si el ratón los posee.
Lista programas compatibles hasta la fecha
Paintbox por medio del controlador de ratón.
The Enterprise Graphical Interfance por medio del controlador de ratón.
SymbOS internamente, solo en modo Boxsoft, pero pronto en modo EnterMice.
Puede funcionar en programas escritos en Basic, por medio del controlador de ratón
Viejos programas que usen el puerto de joystick 1, con EnterMice en modo joystick.
EPDOS 2.X internamente, solo con una tarjeta de expansión serie.
Descripción General
Importante
¡No conectar el interfaz al ordenador cuando la fuente de alimentación esté encendida!
Una vez conectado el interfaz, si tu ordenador no arranca correctamente o si
se comporta de forma extraña, ¡debe ser apagado inmediatamente!
Comprueba que el interfaz esté conectado correctamente y prueba de nuevo.
El ratón y los joysticks pueden ser conectados y desconectados mientras el ordenador está encendido, pero no es recomendable. Es mas seguro realizar las conexiones con la fuente de alimentación apagada.
Conectándolo al ordenador
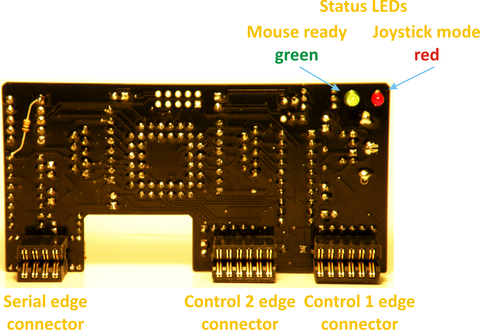
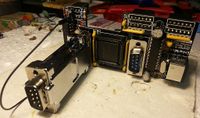
La placa del interfaz debe ser enchufada al mismo tiempo a tres conectores de borde de placa en la parte trasera del tu Enterprise: Control 1, Control 2 y Serial/Net. Puedes apreciar que los conectores de borde de placa están soldados en un ángulo ligeramente mayor de 90 grados. Es completamente intencionado para asegurar que el Entermice se adapte mejor a la forma trasera del Enterprise.
Solo puede ser conectado de una forma determinada, pero puede ser que los terminales no asienten centrados en los conectores de borde de placa. Si así sucede, el contacto puede ser inestable y el ordenador y/o el interfaz pueden no funcionar.
Correctamente conectado, el interfaz funciona inmediatamente una vez que se enciende la fuente de alimentación.
Nada mas encenderse, él mismo se hace una auto-comprobación, durante la cual ambos LEDs, rojo y verde, destellaran 3 veces (independientemente del estado del interruptor 3).
Una vez que el Entermice está conectado a el Enterprise, aunque es preferible conectar el ratón antes de encender el ordenador, el interfaz está provisto de una función de hot-plug(conectado en caliente) que reconoce cuando se ha conectado un ratón, entonces, es clasificado y puesto en marcha.
Después de la correcta inicialización,el LED verde se quedará encendido (si DS3 está ON).
Caracteristicas
El interfaz puede operar en varios modos. Para configurarlo, va provisto de una fila de cinco micro interruptores.
Los valores de configuración se pueden cambiar durante el funcionamiento de la interfaz. No es necesario reiniciar el equipo.
A continuación se muestran todas las configuraciones posibles.
| DS1 | DS2 | Modo de funcionamiento |
|---|---|---|
| ON | ON | Modo de ratón EnterMice |
| OFF | ON | Modo de ratón compatible BoxSoft. Los dos botones principales están intercambiados. El principal ahora es el derecho. |
| OFF | OFF | Modo joystick EnterMice. El movimiento detectado en el ratón es redirigido a la entrada del puerto Joystick 1 y ese puerto es desactivado. |
| ON | OFF | No usado (de hecho EnterMice como joystick en columna KB K) |
Joystick 2 nunca cambia, no importa que en que selección de modo se halle el interfaz.
| DS3 | Estado de los LEDs |
|---|---|
| OFF | Estado de LEDs desactivado |
| ON | Estado de LEDs activado |
Configuración de modo de emulación Joystick:
| DS4 | Sensibilidad |
|---|---|
| OFF | Normal |
| ON | Alta |
| DS5 | Corrección diagonal |
|---|---|
| OFF | Desactivada |
| ON | Activada |
La corrección diagonal mejora la precisión de la simulación de joystick en los movimientos diagonales, a expensas de un ligero descenso en la velocidad.
Uso del controlador
Aquí [7] puedes encontrar el controlador.
Las siguientes instrucciones han sido tomadas del manual original de Paintbox, corregidas y después añadidas las nuevas habilidades de EnterMice.
El ratón y como usarlo en tus programas
El uso del ratón no está restringido a programas en código máquina, se puede incorporar muy fácilmente dentro de casi cualquier programa Basic. Para ello es necesario el uso de una extensión del sistema operativo(EXOS) llamado controlador de ratón("Mouse.xr").
Este controlador de dispositivo dibujará un puntero en cualquier pantalla gráfica, y mediante el control de los movimientos del ratón moverá en sincronía el puntero por la pantalla.
El controlador de ratón puede ser dirigido por medio de varios comandos y funciones, por ejemplo mostrar o no el puntero. Hay dos maneras de comunicarse con el controlador de ratón, la primera es mediante la lectura y escritura en el canal del dispositivo, la segunda es por medio de las variables del sistema.
Instalación
El controlador del ratón se puede instalar por todos los métodos es decir, desde Basic "START"(si está almacenado en un cassette) o LOAD "MOUSE.XR". También se puede cargar desde el "WP", desde EXDOS o desde cualquier otro interprete(revise el manual del lenguaje de programación para más detalles).
Una vez instalado seguirá residente hasta el siguiente restablecimiento completo o hasta apagar el ordenador.
Después, para que funcione correctamente, es necesario inicializarlo con el comando EXOS ":PB". El EGI y Paintbox hacen esto internamente
Ignore el mensaje de error que saldrá. El código de error (obtenido en Basic con la función EXTYPE) es 9.000 + la página de memoria donde se ha cargado el controlador. Este comportamiento fue introducido deliberadamente por los programadores del controlador.
Se puede proporcionar una versión que auto-inicializa sola si se solicita, pero entonces no funcionará con el EGI o con Paintbox, sólo en Basic.
Nunca cargue mas de una vez ni ejecute dos veces el comando de inicialización, ya que el Enterprise se puede quedar colgado.
Ejecutando ":RATÓN" en EXOS nos va a mostrar información sobre la versión del controlador y, si el Entermice está conectado también mostrará información sobre el Interfaz.
Communicating with the mouse driver
As stated above there are two ways in which you can communicate with the Mouse Driver. To demonstrate the two methods and their actions, we shall first look at all the commands, functions and variables then demonstrate their use within a program.
Printed commands and functions
The first and most important action is to open the Mouse channel, ie OPEN £?:"MOUSE:" (? being a channel number).
Commands issued by printing characters to Mouse channel:
| O | Turn pointer on |
|---|---|
| o | Turn pointer off |
| P | Request X & Y position |
Results or status obtained by reading a character from Mouse channel:
Only read after sending "P":
| X | Low byte |
| X | High byte |
| Y | Low byte |
| Y | High byte |
Always readable:
Fire = "1" if main button depressed, "0" if not.
System variables
| Address | Content | Default |
|---|---|---|
| 180 | Video channel, pointer required on | 101 |
| 181 | Position of X,Y co-ordinate on status line | 30 |
| 182 | Status co-ordinate display: 1 on, 0 off | 0 |
| 183 | Colour of pointer {check tech section} | 255 |
| 184 | Low byte of X co-ordinate | |
| 185 | High byte of X co-ordinate. Check demo prog. for co-ordinate conversion. | |
| 186 | Low byte of Y co-ordinate | |
| 187 | High byte of Y co-ordinate | |
| 188 | Status of fire button 0 off, 1 on | |
| 189 | Input device:
0 - Internal Joystick 1 - Control 1 2 - Control 2 3 - Boxsoft 4 - EnterMice (default) 5 - Serial Mouse Sytems 6 - Serial Microsoft on a future release(actually 6 acts the same as 5) >6 - Not implemented |
|
| 190 | Status of secondary button and spare buttons if present, counter of wheel if present.
  Bits 0 to 3 signed nibble of the wheel counter(7 -> -8)
  Bit 4 wheel button
  Bit 6 and 5 spare buttons
  Bit 7 secondary button
      Status of buttons: 0 off, 1 on
|
Examples
100 PROGRAM "ms_test.bas"
110 NUMERIC X,V,MAX_Y",X_COUNT,LASTX,LASTY
120 GRAPHICS
130 CALL MOUSE_SETUP
130 OPEN £1:"mouse:" ! Open a channel to the Mouse
140 DO
15D CALL MOUSE_POS
160 LOOK 1:FIRE ! Check the fire button
170 IF FIRE THEN
130 PRINT £1:"o"; ! Turn the pointer off
190 PLOT LASTX,LASTY,X,Y
200 PRINT 1:"O"; ! Turn the pointer on
210 ELSE
I10 PLOT X,Y,
230 END IF
240 LET LASTX=X:LET LASTY=Y
250 LOOP
250 END
270 DEF MOUSE_SETUP
280 LET CHAR_Y=20 ! No. of characters screen high
290 LET X_COUNT=2 ! Pixel calc no
300 SET 180,101 ! Video channel to put mouse pointer on
310 SET 181,30 ! Position of co-ordinates on status line
320 SET 182,1 ! Show co-ordinates
330 SET 183,255" ! Colour of pointer
310 LET MAX_Y=CHAR_Y*36-2 ! Convert char_y to co-ordinates
350 END DEF
-
Note X_COUNT is = to "2" in 2 colour mode "4" in 4 colour mode "8" in 16 colour mode and "16" in 255 colour mode.
All these values double when in lores.
Now you must add the MOUSE_POS routine. It asks the mouse position to the driver. Select one of the two following ways:
Reading the pointer co-ordinates by reading from Mouse channel.
DEF MOUSE_POS
 PRINT £1:"P"
 LOOK £1:XL
 LOOK £1:XH
 LOOK £1:YL
 LOOK £1:YH
 LET X=XL+256*XH
 LET Y=YL+256*YH
END DEF
Reading the pointer co-ordinates from the system variables.
DEF MOUSE_POS
 ASK 184 XL
 ASK 185 XH
 ASK 186 YL
 ASK 187 YH
 LET X1=XL+256*XH
 LET X=X1*X_COUNT
 LET Y=YL+256*YH
 LET Y=Y*2
 LET Y=MAX_Y—Y
END DEF
You can also command the driver to put the pointer where you want:
Setting the Mouse co-ordinates by the system variables.
DEF POS_MOUSE
 LET X=INT(X/X_COUNT)
 LET XL=X-256*INT(X/256)
 LET XH=INT(X/256)
 LET Y=MAX_Y-Y:LET Y=INT(Y/2)
 LET YL=Y-256*INT(Y/256)
 LET LET YH=INT(Y/256)
 SET 184,XL
 SET 185,XH
 SET 186,YL
 SET 187,YH
END DEF
This program is a very simple art program; simply drawing a line to
follow the movement of the mouse when the "Mouse Button" is
pressed. A call is made to MOUSE_POS on line 150, depending on
how you want to read it you should add into the program the
appropriate procedure from the two listed. There is another
procedure listed, that routine enables you to set the position of the
pointer. Simply call it with the desired position in variables X. and Y,
experiment with the different routines, and try and add them into
your own programs, it won't take long to get the feel of them and
after a very short while you will discover just how easy it is to
incorporate the mouse into existing programs and to write mouse
specific programs.
How to use the wheel and the spare buttons in your programs
To manage bits in Enterprise Basic is slow and difficult. The System Variable 190 has a lot of information in it but it's not easy to extract. You can use this machine code routine inside a Basic program to explode it in five bytes. In addition this MC routine will put to zero the Z_COUNTER every time it's executed:
100 ALLOCATE 42
110 CODE XPLOD=HEX$("18,05,00,00,00,00,00,23,06,
00,0E,BE,F7,10,FE,00,C0,7A,06,04,23,36,00,17,CB,
16,10,F8,23,7A,36,00,ED,6F,57,06,01,0E,BE,F7,10,C9")
120 GRAPHICS
130 OPEN £1:"MOUSE:"
><><><><><><>
520 CALL USR(XPLOD,XPLOD)! We pass the XPLOD address in "hl" register pair
><><><><><><>
930 PRINT PEEK(XPLOD+2)! Secondary mouse button  \
940 PRINT PEEK(XPLOD+3)! Spare button             \
950 PRINT PEEK(XPLOD+4)! Spare button             /  0 idle, 1 pressed
960 PRINT PEEK(XPLOD+5)! Wheel button            /
970 LET B=PEEK(XPLOD+6)! Z_COUNTER(wheel)           two's complement 7 to -8
980 IF B<8 THEN PRINT B
990 IF B>7 THEN PRINT B-16
Here is the disassembly of the machine code routine:
ORG:		jr CODE  ;hl contains the ORG address

BUTTON2:	db 0
BUTTON3:	db 0
BUTTON4:	db 0
BUTTON5:	db 0
Z_COUNT:	db 0

CODE:		inc hl
		ld b,0      ; read
                ld c, 0BEh  ; 190
                rst 030h
                db 10h     ;EXOS 16, Read System Var 190
        	cp 0
         	ret nz     ; if var 190 not found, the driver has not been loaded, return to Basic
         	ld a, d    ;put the obtained value in "a" to be exploded

      		ld b, 4    ; we need a count of 4 for the buttons loop
LOOP:		inc hl
      		ld (hl), 0 ; we don't need old values
         	rla        ; rotate left "a" and put bit 7 on carry
      		rl (hl)	   ; put the carry bit on bit 0 of (hl)
      		djnz LOOP

         	inc hl     ; we still have to extract the wheel count
         	ld a,d     ; recover original 190 variable content on "a"
      		ld (hl), 0 ; we don't need old value
      		rld        ; we are only interested on low nibble of "a"
         	ld d, a	   ; a nibble filled of zeros has come from (hl) to reset the wheel counter
                           ; on low nibble of "a" but leaving the buttons intact on high nibble
      		ld b, 1     ; now we need to write the variable
       		ld c, 0BEh  ; 190
         	rst 030h
         	db 10h     ;EXOS 16, Write System Var 190
         	ret        ;return to Basic
This is an explanation of the procedure to program the wheel:
Low nibble of System variable 190 holds the count of impulses received from the wheel since the last time it was reset. The impulses are positive or negative, the driver adds or subtracts them to the counter, that can hold a value from 7 to -8. The program has to provide a timer routine to check the counter(with XPLOD) every given period. Once checked, the counter is reset to 0(also by the XPLOD routine), an the value found(XPLOD+6) can be used for a task, for example to scroll the screen.
Observe that the secondary mouse button is a "wired" one, and so can also be read directly from the keyboard matrix(with the routine described on the "Reading the joystick interface" section) or easier comparing the value of var 190 with 127(the secondary button is the 7 bit):
ASK 190 SECBUTT
IF SECBUTT>127 THEN GOTO MENU !secondary mouse button pressed!!!
Driver technical information
Executing the HELP command in EXOS you can see the version of the driver in a list that shows all the extensions.
By now the driver only works on graphic modes but it is planned to implement some form of pointer on text mode. Once achieved it will be easy to use the mouse for example on the Basic editor, WP or EXDOS.
Values for EXOS variable 183 to change mouse pointer colour
| SETTING | RESULTANT | |
|---|---|---|
| INK | COLOUR | |
| 2 COLOUR MODE | 0 | 0 |
| 255 | 1 | |
| 4 COLOUR MODE | 0 | 0 |
| 240 | 1 | |
| 15 | 2 | |
| 255 | 3 | |
| 16 COLOUR MODE | 0 | 0 |
| 192 | 1 | |
| 12 | 2 | |
| 204 | 3 | |
| 36 | 4 | |
| 228 | 5 | |
| 48 | 6 | |
| 240 | 7 | |
| 3 | 8 | |
| 195 | 9 | |
| 15 | 10 | |
| 207 | 11 | |
| 51 | 12 | |
| 243 | 13 | |
| 63 | 14 | |
| 255 | 15 | |
| 255 COLOUR MODE | 0-255 | 0-255 |
Joystick mode of the EnterMice mouse interface
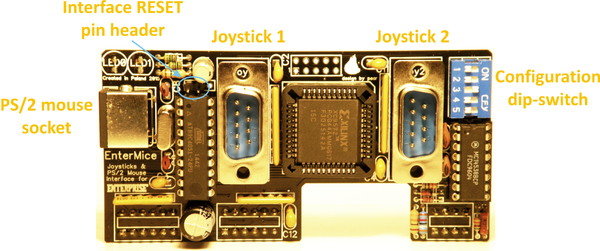
A mouse plugged on the EnterMice PS/2 port is not just restricted to acting as a mouse, it can be made to simulate a joystick. To activate this mode you must put to OFF both DS1 and DS2 switches. The interface then will convert the mouse movement on the PS/2 connector to joystick movement on Joy 1 port. You don't have to unplug your real joystick from that port as it will be disabled. The mouse will then send movement like that of a joystick, useful to manage old programs or games.
If DS3 is ON, in joystick mode lights up red LED. It's blinking when any direction-contact is shorted.
NOTE: The fire button is the left hand button on the mouse. To make use of the right hand button use the routines shown in the section on the mouse interface.
The joystick ports
The EnterMice mouse interface will not only work as a mouse interface but as an intelligent joystick interface. Any ATARI-Kempston-Amiga style joystick can then be inserted into one of the two 9 pin connectors at the back of the interface board. If the joystick has an autofire option it will work. Mouse and joysticks can stay connected at the same time as they don't interfere one to the others.
Reading the joystick interface
Originally the control ports of the Enterprise only had 1 FIRE button, but now the EnterMice interface provides two more on both ports. Obviously, they will not work on old games, only on new releases or new conversions of games.
All normal methods of reading the two ports work. The only extra code required is to read the extra fire buttons. An example of the code is listed below.
100 PROGRAM "JOYFIRE2.BAS"
110 ALLOCATE 40
120 CODE FIRE=HEX$("7C,F3,D3,B5,DB,B6,FB,A5,28,04,21,00,00,C9,
21,01,00,C9")
130 DO
140 LET FIRE2=USR(FIRE,4)
150 IF FIRE2 THEN PRINT "FIRE I PRESSED"
160 LOOP
This is the disassembly of that little code:
org:                     7c 	          ld a,h  ; h is the row, l is the column. (H*256+L)
                         f3               di
                         d3b5             out (b5h),a
                         dbb6             in a,(b6h)
                         fb               ei
                         a5               and l  ; bit 0 is J column, bit 1 is K column, and bit 2 is L column.
                         2804             jr z,pressed
                         210000           ld hl, 00h
                         c9               ret
pressed:                 210100           ld hl,01h
                         c9               ret
You can read the three Fire buttons of the two joystick ports of EnterMice changing in the Basic line "140 LET FIRE2=USR(FIRE,4)", the "4" by a "1" or a "2".(H=0) For the second port you must use "1281","1282" or "1284".(H=5)
This method also can be utilised to read the two main mouse buttons, that are shared with the FIREs of control 1.
Troubleshooting
Keyboard issue
During the creation of the EnterMice, a fairly serious error in the design of the Enterprise was casually discovered.
It stays totally unnoticed if nothing is connected to the ports Control 1 and Control 2. However, the EnterMice uses them...
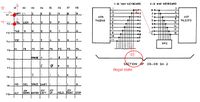
The issue is about interferences on KB0..KB9 ports from keyboard, that are also utilised by the control ports.
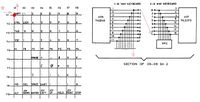
If only one key is pressed at the keyboard, then nothing wrong happens (see figure 1).
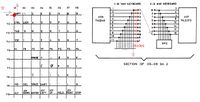
However, if you press two keys in the same column simultaneously, the signal from the selected line will be transferred to the line of the second key as well (figure 2).
The Enterprise lacks blocking return diodes to separate the rows of the keyboard!
Electrically nothing will happen (the LS145 decoder inside the computer has open collector outputs), but reading from the external ports Control 1 and Control 2 causes errors.
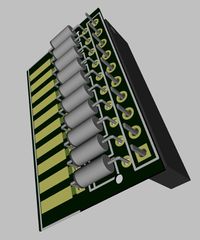
In order to eliminate the cause, diodes should be added to each row of keys on the Enterprise, to avoid that pressing more than one key it can cause "collisions" (figure 3).
Pear has prepared a draft of a PCB to fix it, but it has not been tested yet. In the meanwhile, in order to avoid errors, the keyboard should not be operated while joysticks or mouse are in use.
Microsoft Optical Mouse
The PS/2 Microsoft Optical Mouse is a special case. It should be only connected inserted on its original Microsoft USB to PS/2 converter. It will work with EnterMice if connected before power on, but in this particular case, you can not use the hot-plug feature as it will be not recognised.
EnterMice can be forced to recognise the Microsoft mouse during operation, you only need to momentarily short the RESET pin-header on the interface or press RESET button on newer board version (it resets only the interface, not the computer).
Technical specification
Joystick port pinout
| pin | signal |
|---|---|
| 1 | Up |
| 2 | Down |
| 3 | Left |
| 4 | Right |
| 5 | Fire 3 |
| 6 | Fire 1 |
| 7 | +5 V |
| 8 | GND |
| 9 | Fire 2 |
Control Map
| J column (bit 0) | K column (bit 1) | L column (bit 2) | |||||
|---|---|---|---|---|---|---|---|
| JM=0* | JM=1* | JM=0 | JM=1 | JM=0 | JM=1 | ||
| Control 1 | Row 0 Fire | Joy 1 Fire 1 | Mice Left Btn | Mice Left Btn or Joy 1 Fire 2* | Joy 1 Fire 2 | Mice Right Btn or Joy 1 Fire 3* | |
| Row 1 Up | Joy 1 Up | Mice D0 | Mice D0 | spare | spare | spare | |
| Row 2 Down | Joy 1 Down | Mice D1 | Mice D1 | spare | spare | spare | |
| Row 3 Left | Joy 1 Left | Mice D2 | Mice D2 | spare | spare | spare | |
| Row 4 Right | Joy 1 Right | Mice D3 | Mice D3 | spare | spare | spare | |
| Control 2 | Row 5 Fire | Joy 2 Fire 1 | Joy 2 Fire 2 | Joy 2 Fire 3 | |||
| Row 6 Up | Joy 2 Up | spare | spare | spare | spare | ||
| Row 7 Down | Joy 2 Down | spare | spare | spare | spare | ||
| Row 8 Left | Joy 2 Left | spare | spare | spare | spare | ||
| Row 9 Right | Joy 2 Right | spare | spare | spare | spare | ||
* Mouse buttons have higher priority
* JM=0 (DS1 ON)  native EnterMice mouse mode
  JM=1 (DS1 OFF) joystick emulation & BoxSoft compatible mode
Sega Twister
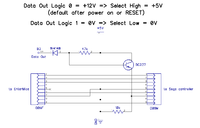
to connect the Sega six-button pad [8]
Sega Six Button Controller Hardware Info
Interface Protocol of SEGA MegaDrive's 6-Button-Controller
| pin | Select = Low | Select = High | Select = pulse-3 |
|---|---|---|---|
| 1 | Up | Up | Button Z |
| 2 | Down | Down | Button Y |
| 3 | GND | Left | Button X |
| 4 | GND | Right | not used |
| 5 | +5V | ||
| 6 | Button A | Button B | not used |
| 7 | Select | ||
| 8 | GND | ||
| 9 | Start | Button C | not used |
Information for developers
EnterMice timings
The firmware of EnterMice is optimized for the cyclic reading with 50 Hz frequency (video IRQ).
| Default reading cycle | 20 ms |
| Waiting time to perform self-test the PS/2 mouse (timeout) | ca. 2000 ms |
| Time of collecting the PS/2 mouse data | max. 12 ms |
| Time from change state of RTS signal to issue data (nibble) for reading | 25 μs |
| Standby time for the next reading (counting from data issue) | 14 μs |
| Time from read the last nibble of data to reset the nibble counter (timeout)* | 1500 μs |
| Default mouse polling time in joystick emulation mode | 30 ms |
| Mouse polling time in joystick emulation mode when mouse doesn't move (minimize polling delay) | 12,5 ms |
* After this time starts another mouse data polling.
Data buffer
Data buffer in EnterMice has a size of 16 bytes.
Currently is used only a half. The remainder may be used in the future.
| Bits | High nibble | Low nibble | Content | |||||||||
|---|---|---|---|---|---|---|---|---|---|---|---|---|
| Byte | 7 | 6 | 5 | 4 | 3 | 2 | 1 | 0 | ||||
| 0 | X value | signed int (positive is moved left) | BoxSoft protocol | |||||||||
| 1 | Y value | signed int (positive is moved up) | ||||||||||
| 2 | 0 | 0 | 0 | 1 | 0 | Btn5 | Btn4 | Btn3 | Protocol identification & buttons 3,4,5 state (1=pressed) | Extended MSX protocol | ||
| 3 | Horizontal wheel* | Z value | signed int (positive is wheel moved up) | |||||||||
| 4 | ExCnt | Mouse ID | Extra bytes available to read (include this) & PS/2 mouse ID | EnterMice extension protocol | ||||||||
| 5 | Hw ver. mj. | Hw ver. mn. | Hardware version (major.minor) | |||||||||
| 6 | Fw ver. mj. | Fw ver. mn. | Firmware version (major.minor) | |||||||||
| 7 | Device ID | EnterMice ID is 5Dh | ||||||||||
* not implemented yet, now all 8 bits represents a Z value (Vertical wheel)
You do not need to read all the data from the buffer.
Reading can be interrupted at any time. There will be the timeout and interface performs another read data from mice, then once again be ready to send data.
Last state of RTS signal also not matter. EnterMice reacts to the change state, not on the signal level.
Mouse reading
| ; Here begin the Neos mouse reading | ||
| ld hl,X_REL | ; first byte | |
| ld a,2 | ; put RTS low, the contrary to normal MSX | |
| out (0B7h),a | ||
| ld b,3 | ; long delay. Stock was 8 | |
| call WAIT | ||
| call READ_4BIT | ; read four higher bits | |
| rld | ; push them in (HL) | |
| xor a | ; put RTS high | |
| out (0B7h),a | ||
| ld b,2 | ; short delay. Stock was 5 | |
| call WAIT | ||
| call READ_4BIT | ; read four lower bits | |
| rld | ; push them in (HL) | |
| ld hl,Y_REL | ; second byte | |
| ld a,2 | ; put RTS low | |
| out (0B7h),a | ||
| ld b,2 | ; short delay. Stock was 5 | |
| call WAIT | ||
| call READ_4BIT | ; read four higher bits | |
| rld | ; push them in (HL) | |
| xor a | ; put RTS high | |
| out (0B7h),a | ||
| ld b,2 | ; short delay. Stock was 5 | |
| call WAIT | ||
| call READ_4BIT | ; read four lower bits | |
| rld | ; push them in (HL) | |
| ;<======Here will be added the future Wheel and three spare buttons reading. SECOND TENTATIVE | ||
| ld hl,SW_Z_STATUS | ||
| ld a,2 | ; put RTS low | |
| out (0B7h),a | ||
| ld b,2 | ; short delay. Stock was 5 | |
| call WAIT | ||
| call READ_4BIT | ; read four higher bits | |
| and 15 | ||
| cp 1 | ; IF THIS NIBBLE=0001 THEN THE MOUSE IS IN EXTENDED PROTOCOL | |
| jr z,CONTINUE_READ | ||
| xor a | ; we must leave RTS high for the next mouse reading cycle | |
| out (0B7h),a | ;IGNORE THAT NIBBLE | |
| ld (hl),0 | ; we don't need old values | |
| jr STOP_READ | ||
| CONTINUE_READ: | ||
| xor a | ; put RTS high | |
| out (0B7h),a | ||
| ld b,2 | ; short delay. Stock was 5 | |
| call WAIT | ||
| call READ_4BIT | ; read four higher bits, the three lower bits are the buttons. They come ready to store | |
| push af | ; push them in stack. they are in the lower nibble. | |
| ld a,(hl) | ; | |
| push af | ;save the Z counter for later. | |
| ld a,2 | ; put RTS low | |
| out (0B7h),a | ||
| ld b,2 | ; short delay. Stock was 5 | |
| call WAIT | ||
| call READ_4BIT | ; read four bits | |
| rld | ;we need z displacement in 8 bit | |
| xor a | ; put RTS high for the next mouse reading cycle | |
| out (0B7h),a | ||
| ld b,2 | ; short delay. Stock was 5 | |
| call WAIT | ||
| call READ_4BIT | ; read four lower bits. Z displacement | |
| rld | ; push them in (HL) ;NOW WE HAVE Z displacement in (hl) | |
| pop af | ; restored Z counter to "a", but we have garbage on high nibble | |
| and 00Fh | ||
| bit 3,a | ||
| jr z,SIGN_DONE | ||
| or 0F0h | ||
| SIGN_DONE: | ; now we have the sign extended to 8 bits on "a" | |
| add a,(hl) | ||
| cp 128 | ; positive or negative? | |
| jr c,POSITIVE | ||
| cp 248 | ; lower than -8? | |
| jr nc,FINISHED | ; | |
| ld a,248 | ; -8 is the bottom | |
| jr FINISHED | ||
| POSITIVE: | ||
| cp 8 | ; higher than 7? | |
| jr c,FINISHED | ||
| ld a,7 | ; 7 is the top | |
| FINISHED: | ; the excess of 7 or -8 has been wiped | |
| ld c,a | ; save Z addition on c | |
| pop af | ; retrieve the buttons status. They are now on first nibble of a | |
| rld | ; buttons stored | |
| ld a,c | ; we only need the first nibble of Z counter addition | |
| rld | ; the spare buttons status and the Z counter are now in SW_Z_STATUS | |
| STOP_READ: | ||
| xor a | ; recall buttons on row 0 | |
| out (0B5h),a | ||
| in a,(0B6h) | ; read Mouse buttons | |
| and 7 | ; mask | |
| xor 7 | ; flip them all as on Enterprise a pressed key is 1 and released 0 | |
| rl (hl) | ; Get ready the bit 7 of "hl" register pair. Inside is SW_Z_STATUS, variable number 190 | |
| srl a | ; This is the very FIRST "srl a". The button status is now in the carry flag | |
| ; secondary button of Boxsoft is read on J column. Primary button of EnterMice is read on K column | ||
| push af | ||
| ld a,(INPUT_DEVICE) | ||
| cp 3 | ; Boxsoft interface mode buttons | |
| jr nz,L_BUTTON | ||
| pop af | ; We need the value of "a" and "f" registers. Carry flag still stores the value of secondary button | |
| rr (hl) | ; secondary button goes to bit 7 of SW_Z_STATUS, variable number 190 | |
| srl a | ; Primary button of Boxsoft is on J column. This is the second "srl a" | |
| JR MAIN_BUTTON | ||
| L_BUTTON: | ; EnterMice interface mode buttons | |
| pop af | ; retrieve the value of register "a". "f" is disposable, soon we will load the button on carry flag | |
| push af | ; I still will need later the register "a" value | |
| srl a | ; two "srl a" because the secondary button of EnterMice is read on L column | |
| srl a | ; the proper button status is now in the carry flag | |
| rr (hl) | ; secondary button goes to bit 7 of SW_Z_STATUS, variable number 190 | |
| pop af | ; retrieve the value of register "a" just after the FIRST "srl a" | |
| MAIN_BUTTON: | ||
| and 1 | ||
| ld (FIRE_STATUS),a | ; EXOS Variable 188. K column if Boxsoft or L column if EnterMice | |
| call sub_C3A6 | ; this is the "corrections and drawing" routine where the "velocity" 1.1 modification was made | |
| ld a,(X_REL) | ||
| ld c,a | ||
| ld a,(Y_REL) | ||
| or c | ||
| ret | ||
| XXXXXXXXXXXXXX | XXXXXXXXXXXXXXXXXXXX | XXXXXXXXXXXXXX |
| WAIT: | ||
| nop | ||
| nop | ||
| nop | ||
| dec b | ||
| jr nz,WAIT | ||
| ret | ||
| XXXXXXXXXXXXXX | XXXXXXXXXXXXXXXXXXXX | XXXXXXXXXXXXXX |
| READ_4BIT: | ; I split the routine in two to not put more processor time | |
| ld b,4 | ||
| ld d,0 | ||
| ld a,(INPUT_DEVICE) | ||
| cp 3 | ||
| jr z,L_COLUMN | ||
| K_COLUMN: | ||
| ld a,b | ||
| ;inc c | ; this is not necessary | |
| out (0B5h),a | ||
| in a,(0B6h) | ||
| ;ld c,a | ; this is not necessary | |
| rra | ; data read from K column | |
| rra | ||
| rl d | ||
| djnz K_COLUMN | ||
| jr CONTINUE | ||
| L_COLUMN: | ||
| ld a,b | ||
| ;inc c | ; this is not necessary | |
| out (0B5h),a | ||
| in a,(0B6h) | ||
| ;ld c,a | ; this is not necessary | |
| rra | ; data read from L column | |
| rl d | ||
| djnz L_COLUMN | ||
| CONTINUE: | ||
| ld a,d | ||
| ret |
